Sunday, June 12, 2011

4th grade teacher's gift -- Thanks a million, Mrs. R!


I've done these bags for 8 years now.  There's even one teacher here in Hudson that has two of them since she had my oldest and my youngest both for 3rd grade.  This latest version was for my little guy's 4th grade teacher.  She was a marvel this year.  Super smart and super creative.  You should have seen the "environment board" the class created for their China theme.  She took a map of China, blew it up (like really blew it up -- it covered 4 large tables pushed together) and then transferred the map to plywood.  The boys formed groups and each worked on a different region of China.  My son had the South which included terraced fields, a bamboo forest, etc.  The boys made all the topography out of clay, styrofoam, whatever.  The Great Wall was sugar cubes.  It was amazing. 

So, she deserved an equally creative bag made by the awesome boys this year.  Each boy received a 6-inch square of nice white cotton.  They turned their squares into me and I made the bag.  One side of the bag has a special center square.  I had it embroidered to represent their other major theme this year:  Whaling.  They had a mock voyage on a mock boat and named themselves the Nantucket Slayers.  My guy was the 1st Harpooner, thank you very much. 

The highlight of their year was a 6-day trip to New England including Mystic Seaport, Provincetown, and Nantucket.  Photo below is the group in front of the Brant Point Lighthouse on Nantucket.  You know it's an amazing trip when your son's highlight was a museum.  The Whaling Museum on Nantucket is on many lists of  "100 things to see before you die."  Nate is completely enamored with Fresnel lens, used in lighthouses to amplify the light.  He studied a lighthouse on the island that was one of the first in the world to use this type of lens. 

What can I say?  University School is the best.

Saturday, May 28, 2011

Where have you been?

I'm embarrassed to see the date of my last post.  Truly I am.  My excuse is that it is baseball season here in Ohio (not that the weather has cooperated).  I have three boys, they all play, and I have anywhere from 6 to 12 "baseball viewing opportunities" each and every week.  Add to that 2 new perennial beds, 10 yards of Sweet Peat to spread, and you have my life these last 8 weeks.

My Vitamin D is in ample supply with all these outdoor pursuits but I have still been working a bit indoors.  These are tape measures that are embellished using recycled wool and vintage buttons.  The petals are hand-cut and then inserted using a proddy tool normally relegated to rug hooking.  I love Craft Crossover.  It's one of the reasons I am constantly trying new things.  You never know when you'll discover some incredibly useful technique.

I'm using these as teacher gifts this year.  The tape measures are the round ones with the push button to retract the tape.  I find them for $1 each at Hobby Lobby.  I cut 4-inch circles of two different wools, make a sandwich, and stitch it up using the zipper foot.  Then I take a scrap and cover the end tab of the tape.  Finally, I sew on the vintage button and proddy the petals, making sure the push button is on the plain side of the work.  Otherwise the button and flower would block the only means of retracting the tape.

I hope you enjoy.  Happy spring!

Sunday, March 27, 2011

Grandma's handkerchiefs find a new use

This is a handkerchief holder that my grandma sent me years ago.  Filled with beautiful and delicate handkerchiefs.  The holder itself is stunning.  Embroidery on silk;  ivory on ivory -- one of my favorite combinations.  I've had these for years and finally decided to do something substantial.  A scarf!

After carefully washing and ironing 14 of the handkerchiefs, I laid them out in two long rows and worked the arrangement until each row was pretty much the same length.  I decided not to sweat about whether the edges matched up.  I only wanted the ends to be the same.  There's a handkerchief with a very delicate "S" embroidered on it.  I knew that one needed to be on one of the ends.  My grandma's name was Sadie and I think that handkerchief was her very own.

I sewed the handkerchiefs together using a very basic zig zag.  I had a few tension issues at first but got it together and the sewing went very quickly.  My machine is used to slogging through recycled wool sweaters and cashmere.  This stuff was far too delicate!

The final result is a light and airy, beautiful spring scarf.  I can't wait for the weather to warm up just a touch so I can trade my cashmere scarf for this one.  Today it never crossed the 30 degree line so it may be a week or two before I can wear it.

In the meantime, my next project is looming.  Literally.  I have a theory that I can weave long strips of cashmere and make some fabulous scarves for next winter.  I found a great tutorial here:  http://www.hallnet.com/Weave.html
and have already bought and marked the wood for cutting.  I'm going to try it out first on some old t-shirts rather than risk cutting up the cashmere without a plan.  Can't wait.

What wintery projects are you hatching this spring?

Wednesday, March 9, 2011

Valence for my office -- sewing group project

It all starts with Grandma's beads.  My grandma was precious to me.  She died 2 years ago at age 103 so I was fortunate to have had plenty of adulthood to grow my appreciation for her.  She taught me to knit;  this passion of mine that has never ceased to provide interest and challenge even after 25 years.  She was a fabulous cook, gardener, craftswoman, etc.  She took me to my first Broadway show (A Chorus Line in its original run) and went with me to look at wedding reception spots since my wedding was in her town and my mom lived across the country.  I miss her every day.  But, I have some things that remind me.  Like her beads.

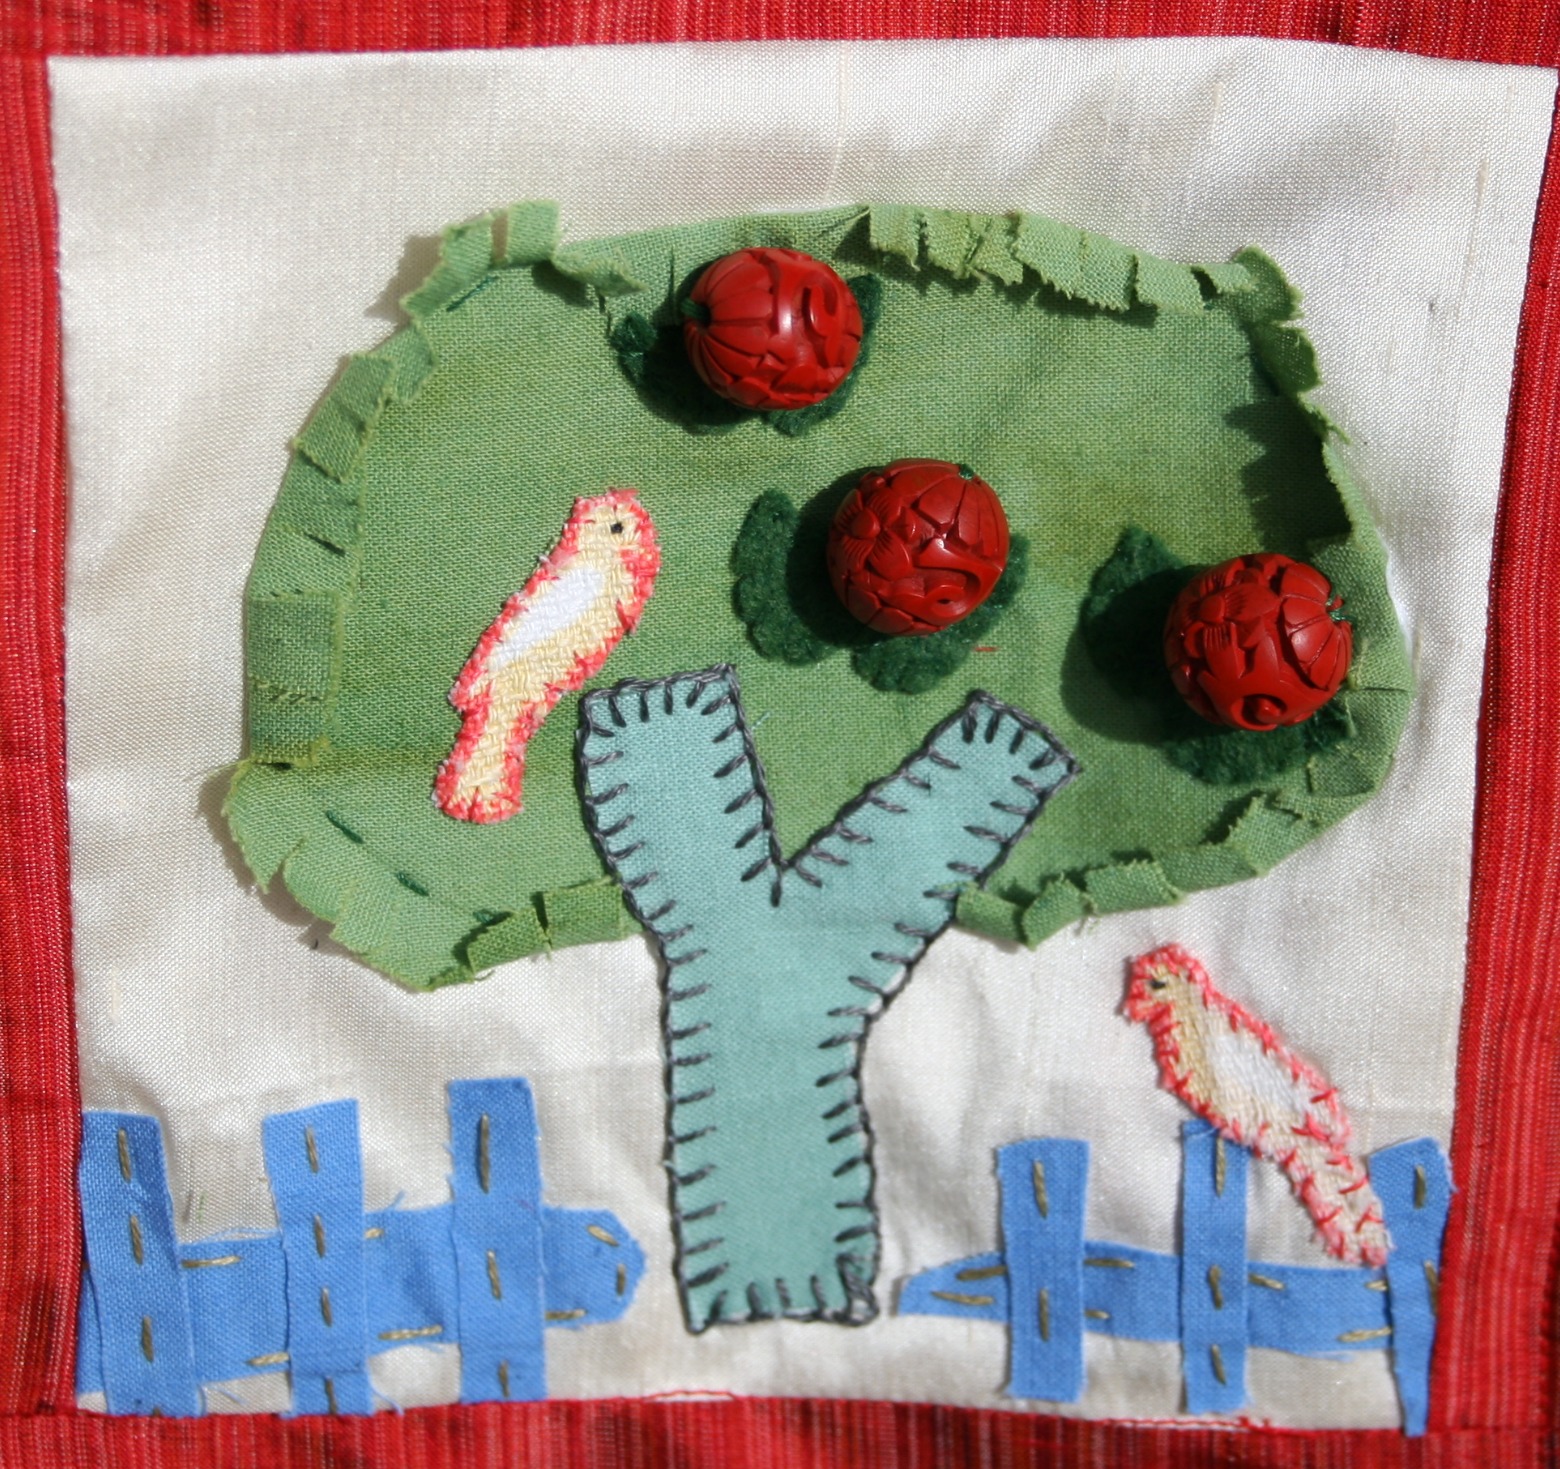
These are true cinnabar beads.  Thick with color and beautifully carved.  I'm sure they came from Asian during one of her many travels with my Grandfather in his consulting days.  This red is my favorite shade.  When Grandma gave me a strand of these beads, I was thrilled.  But, I don't wear necklaces too much so I re-strung some of the beads into a bracelet.  The others were left in the drawer for several years.  Then, I made them the centerpiece of one of my sewing group projects.  For those new to my blog, my sewing group is an eclectic mix of craftswomen from every corner of the fiber world:  embroidery, sewing, quilting, knitting, felting, etc.  We do it all.  We've been together for years and work on projects for each other through the year. 

This project is from about 3 years ago. I wanted to make a mantle scarf for the fireplace in our living room. We have some early American stenciling on the walls in there. I wanted the feel of the stenciling (primitive, botanical, folk art) and wanted at least one of these beads included in the design. I received 6 fabulous squares. That year we only had 7 of us in the group and I never did one of these for myself. The background is ivory silk. Once they were all done, I carefully packed them away until I had a chance to use them. 
Life ensued.  Now the living room has become my husband's study and, frankly, he has little or no appreciation for my sewing group.  He tolerates it and often asks, "What on earth are you making now?" but doesn't really get it.  So, why waste this fabulous workmanship on him?!  I have a new desk in my "study" which is just a pass-through room just off the kitchen.  I took down the homespun plaid curtains because I don't find them very interesting.  But, what to do for a window treatment?!  Aha!!  The squares!!  A valence would be the perfect thing!


Now they grace this window where I can look out on the backyard while I type blog posts.  On the sill is my little heart collection.  Not a passion, just something I pick up when I find one I like.  Or, if I'm lucky, my boys make one for me.

The valence is actually a Rumpelstiltskin project, too!  I knew I wanted red for the borders of the valence and was prepared to go to the fabric store to buy some.  But, I remembered my vegetables that the sewing group had done years earlier.  I used a fab red silk for some of those.  Dig, dig, dig in the bin in the cedar closet and Voila!  Enough silk for the entire valence.  I had lining, matching thread, everything!  I didn't spend a dime.

My sewing group is probably my single favorite activity.  I love the creative challenge.  I love having a smallish project on which to try new techniques.  I especially love the Show & Tell at the beginning of our get-togethers where we share our latest creations, either for the group or for personal use.  Many of these women are in no other part of my life -- I only see them at sewing.  But, I look forward to our monthly gatherings in a way that is hard to explain.

Monday, February 7, 2011

Granny Square tote bag is done!

Omigoodness!  How cute is this!  And, how glad am I that I had enough for TWO totebags.  One for me (natch!) and one for my lovely customer in Australia.  I even have enough blanket leftover to make some messenger bags.

Here's the process.  The first step is cutting the afghan up into totebag sizes.  Here's a picture of the pieces as I cut them.  I had enough for two of these cross-shaped pieces.  The narrow strips going out each side become the sides of the bag. 

The most boring part was to very carefully, in excellent light, snip the yarn connecting the different sections together.  I wanted my edge to be just the squares themselves.  No scalloped edge or other connecting threads.  Doing this for both bag pieces plus the leftover squares I'm going to use for messenger bags took FOREVER.

Once I had the threads snipped, I laced up the sides of the bag.  I've done this on my machine before, but the wear and tear sewing on such thick fabric is not worth it.  I couldn't get a good picture of the lacing, but it came out nice enough that I kept it on the outside, finished side of the bag!

So, now I have my bag form.  I then made my lining pieces including one pocket inside.  I also sewed the straps on by hand.  Now to the machine.  I did break two sewing needles between the two bags, but I was able to sew in the lining on the machine.  I sew right sides together and then flip the lining inside the bag and top stitch the fold.  Then I sew the bottom of the lining last from the right side.  This makes for a beautiful finished edge, but is rough on such thick fabric.  I think for the messenger bag I will make a finished lining with a pressed top edge and just sew the finished lining into the bag.  Easier on my machine.

Here's a shot of the lining.  Valori Wells "Hoot."  Very colorful with fanciful trees and flowers plus a couple of birds thrown in.  The pocket is just plain brown.  I didn't want any pattern to compete with the print.

All in all, a great project.  I'm only sorry I had the afghan for 6 months before actually doing it!

Sunday, February 6, 2011

Rumplestiltskin Challenge -- The Fraktur wall hanging

I am completely fascinated by Frakturs.  They normally take the form of wedding announcements or commemoration of other important events.  And, they are normally done on paper.  I have a great book, Fraktur, by Ruthanne Hartung, and the motifs in this wall hanging were modified from ones in the book. I have plans to do a hooked rug in the same genre.

I began work on this during the Christmas holiday.  If you know me, you know I am completely unable to just sit and watch TV.  I have to have something to do with my hands.  If I'm between projects, I get this glassy look in my eyes and I start to twitch and sweat until I have some wool in my hands and am ready for the evening's work.  My husband thinks I'm nuts.

Even though I started this before I even knew about the Rumplestiltskin Challenge, it certainly qualifies.  I didn't buy a thing.  I even had the dowel for the back to make sure it was hanging straight!

The background red wool is one of my favorite colors.  It looks very much like the wool I used for my poinsettias this year.  I always include blue and mustard in things I make for my house because much of my trim (and all the wallpaper in this foyer) is mustard.  Blue complements mustard.  Funny how that color wheel comes in handy from time to time!  The rest of the colors were just bits and pieces from my bins of wool.  I love plaid so there's a lot of plaid in every motif.  I was so happy to use up some very small bits of favorite plaids like in the smallest heart and the central star in the star circle motif.  It's like having old friends around.

I should mention the eggs in the wooden bowl.  They are hardshell gourds (appropriately called Easter Egg gourds) that I grew myself many years ago.  A fabulous local artist named Rebekah Smith painted them for me.  She also did the Early American stenciling in my living room.  A true American folk artist.  The bird nests in the bowl are all gathered from my yard after the babies have flown the nest.  One year a robin built a nest in the hanging bird feeder we have right outside our tv room window.  It was fabulous having a nest only a foot outside the window.  When all the babies had flown away, I got out a ladder and salvaged the nest.

Remember the Granny Square afghan?  I'm finishing up 2 tote bags from that this week.  Watch for a post later in the week with finished product pictures.

Thursday, January 27, 2011

An idea whose time has come!

I love this idea.  The genius behind it can be found here:  http://fivegreenacres.wordpress.com/2011/01/14/the-rumpelstiltskin-challenge/

The plan is to work from what we have.  Work from the stashed stacks of fabric, bins of recycled wool sweaters and skirts, containers of buttons and trim, etc.  She says you can continue to buy your "staples" like thread, interfacing ... that sort of thing.  The challenge is to just try it.  How long can you last?  A week?  A couple of months?  Who knows?

I'm starting on this with my current project, the Granny Square afghan remake.  I had the afghan and, yes, I did buy some lining fabric.  But, I've got some black leather straps already on hand, magnetic snaps, and all the other stuff.  I want to put some pockets in the bag and was planning to go to the fabric store and find a cute coordinating pattern since my lining fabric is a big print.  BUT I'M NOT GOING TO DO THAT!  By God, I'm going to find something downstairs in the cedar closet that works. 

I've been wanting to make some small stuffed sheep using different recycled wool plaids.  I've got all the stuff here for that!  I'm going to do it!  Any idiot can go to a store (thrift or otherwise) and buy a bunch of stuff for a new project.  The wise ones use up what they have.  I bet I can do this with my cooking, too!  What's in the pantry?  What's hiding in the back of the cereal cupboard?  What havoc can I wreak on my kids' dinners?

I can't wait.  Stay tuned for my progress.  And, thanks to fivegreenacres!


Monday, January 17, 2011

What's to become of me?

Watch out!  The bags are back in town. 

After many months of gloves and scarves, I'm feeling the itch to make some handbags.  This fab afghan was bought on Etsy last summer.  I was scheming with a lovely lady in Australia to make a couple bags out of it and have some fun.  The afghan is a black base and the squares are refreshingly subtle for a Granny Square blanket.  Sometimes, so garish...

I've ordered some lining fabric and some leather straps for handles.  Stay tuned...

Tuesday, January 4, 2011

S is for Sunflower -- and screening

I think I've spoken of my sewing group before.  There are 8 of us and we do creative projects for each other during the year.  We've been together for 7 or 8 years and the things we have done are spectacular.  For the first few years, we had specific guidelines that everyone followed.  One year was color, one year was theme, etc.  The color year I chose blue and brown and asked for 6-inch squares in those colors.  The techniques range from quilting to embroidery to knitting to everything in between.  I think I'll do some blog posts in the next few weeks about past creations.

This year my personal theme is Sheep and I gave everyone a 9-inch square of hand-dyed wool with the instruction to do a sheep.  I've received 4 so far and they are great.

This sunflower mat is for my friend, Kathy.  Her theme this year is for all of us to use leftover screening from her porch repair and to use the screening as the base fabric for our creation.  The only other stipulation was that we incorporate the letter "S" in the design.

The minute I saw it, I immediately thought of rug hooking.  I tried out a few strips to see what would work and settled on a #6 cut.  Because the holes are so small, I had to use a small hook that I picked up at a garage sale one time.  Not my beautiful hook that I use most of the time.  And, once I tried out the hooking, I realized that this was not going to be as pleasant and relaxing as hooking on linen.

Screening is hard plastic and has zero give.  Even if I wiggled the hook around, I couldn't get the little hole to be very big.  I was also using a fairly loose weave plaid for the main color of the mat and the loose weave did NOT want to be cut in a narrow #6 cut.  The green fabric was great -- tightly woven and a bit felted but still very flexible. 

The screening scratched my hands and, because I had to use a hoop instead of a traditional frame, my pulling action was very awkward.  I did not enjoy.  I felt like it took twice as long because I had to grip the frame while I pulled each loop through.  The screening was also difficult because it's black.  So, I had to use some special transfer paper to trace out the "S" so it would look right.

The smartest thing I did, though was to hook a small circle at the top of the stem as a placeholder for the proddy technique I used to make the petals of the sunflower.  This worked perfectly and as I prodded the petals, I gradually removed the small circle. 

All in all, I like how it came out, but it was a pain.  However, below is the project Kathy did for me a few years back when I had everyone do a vegetable.  The 8 vegetables hang in my kitchen at our lake house and they are all fabulous.  Kathy did squash and I know this type of work takes hours and hours.  So, as I scratched my way through I remembered the incredibly beautiful work Kathy has done for me year after year.  She's worth the effort.