Sunday, December 14, 2014
Holiday decor tour, continued
As I said, I'm a sucker for white and metallic. I've talked about this mantle before. Here is that post. This year I switched out a few of the ornaments and used different trees since I used my birch bark trees on the other mantle. The spidery looking balls at the back are the dried seed heads of allium. I spray them gold and they add an airiness to the display. Here's a detail shot from the side. This mantle never gets old to me. If it wasn't so holiday, I would leave it up all year.
Here's a little vignette I have on a side table. The feather tree in the background is wool. I saw this on Pinterest last year and knew that I had to make a wool feather tree. My house was built in 1836 so early American touches just fit. But, a feather tree of wool? It's like they knew I was coming. I found the pattern on Etsy for about $12. Downloadable pdf with many sizes. Here is the pattern for sale. The instructions were very clear and I made a 24" tree and a 12" tree. My plan is to take kumquats, slice them thinly, and dry the slices as you would oranges. I think the little slices would make the perfect ornaments and would be just the right scale. But, as luck would have it, kumquats are in short supply this year so I haven't been able to do this. I keep looking every time I'm at the grocery.
The Santas are from my friend, Brigitte, as I mentioned earlier. Brigitte mixes different fabrics, fur, and embellishments for these. I love them. One of them has crewel fabric for the base and you know I'm a big fan of crewel.
The detail picture shows the star on top of the feather tree. Again, I took some wool and cut out 2 stars. I blanket stitched around the outside using gold thread and adding a bead to every stitch. I love how the beads line up perfectly along the edge. The star is stuffed slightly with scraps. And, a vintage pin for sparkle.
This little tree was made using scraps of cashmere. It's a styrofoam cone on the inside. I cut little squares of cashmere and attached them using short upholstery tacks because pins would be too long. The top of the cone is only about 1/2-inch wide. The texture is fantastic. Again, this is a technique I used for one of the ornaments at my party. I'll post pictures of those ornaments soon. The top of the tree is a mish mash. I wanted a pom pom and got out some gold cord to make one. But, the cord didn't want to be a pom pom. It looked like a haystack instead. I couldn't bear to throw it away and really liked the way the cording draped. So, I got a little glitter star out of my holiday floral bin and stuck it through the haystack. I love the way it looks!
These two mantles are the mainstay of my holiday decor. I've got little handmade touches in almost every room, though. Ornaments hanging from cabinets, little touches of red and green, and lots and lots of sparkle. I hope you love what you see. I certainly do.
Labels:
allium,
felted wool,
holiday decorating,
making do,
upcycled cashmere
Friday, December 12, 2014
Holiday Decorations Tour 2014
I've seen bloggers doing a photo tour of their holiday decorations and I thought I would give that a try. Much of my decor is handmade by me so I do think my displays are unique. Today, let's start with my newest mantle in what we call The Connector Room because it connects the old house to a barn addition we did several years ago.
Here is a full view and a detailed shot. There are 4 types of trees on the mantle. Birch bark trees in 2 sizes (4 trees total). Metal trees with a ivory/metallic paint color (2 medium and 1 large), 4 small bottle brush trees, and 2 trees that I made with styrofoam cones and the ribbings cut from ivory wool sweaters. These were just made this fall and they came out great. They look like giant evergreens that are completely covered in snow. Shaggy and fabulous.
Here is the detail of the stars on top of the sweater ribbing trees. I made little stars out of ivory wool, stuffed them a bit, and edged them with beads using a basic blanket stitch and gold silk thread. Then I added a vintage brooch to the center for some sparkle. These echo the vintage brooches that I used in the fabulous pompom wreath on the fireplace itself. I talk more about the wreath in a previous post from last winter. Find that post here.
Heres a closer shot of our stockings. The two on the ends were made by my friend, Brigitte, and I won them in the Stocking Contest on separate years. Mine, on the right, is made with about 20 types of vintage lace. My husband's, on the left, has a great Father Christmas face which is Brigitte's signature creation. She makes Santa sculptures that you'll see more of in a bit. The other stockings were all made by me. Tin soldier, snowman, and reindeer for my boys. A Christmas tree with dog bone ornaments and a little matrushka doll for my dogs. The lining for all is a great Mexican print with little boy angels flying around.
This grouping of ornaments hangs from one of the old barn beams to the left of the fireplace. I'm going to re-do it next year with ivory ribbon but I just got tired of messing with it this year. I tried 3 different ways of hanging these and just got fed up with it (and tired of risking life and limb on a ladder). These ornaments are mostly purchased. The large textured ball was made by me and is a styrofoam ball completely covered in small bits of ivory cashmere, painstakingly attached one by one with pins. It is soft and so fabulous. I included a small version of this for my ornament party last week. All my friends loved making the ornaments. It's so soothing to just sit and work on something like that. Over 100 pins and bits of cloth attached one by one by one. Why is that so relaxing? The repetitiveness? Maybe it's just working with cashmere.
On the next post I'll cover some of the other decorations around the house. Spoiler alert: I'm a sucker for ivory and metallic mantles.
I have glitter/metallic poly mesh under the whole thing and some basic lights with a white cord.
Here is the detail of the stars on top of the sweater ribbing trees. I made little stars out of ivory wool, stuffed them a bit, and edged them with beads using a basic blanket stitch and gold silk thread. Then I added a vintage brooch to the center for some sparkle. These echo the vintage brooches that I used in the fabulous pompom wreath on the fireplace itself. I talk more about the wreath in a previous post from last winter. Find that post here.
This grouping of ornaments hangs from one of the old barn beams to the left of the fireplace. I'm going to re-do it next year with ivory ribbon but I just got tired of messing with it this year. I tried 3 different ways of hanging these and just got fed up with it (and tired of risking life and limb on a ladder). These ornaments are mostly purchased. The large textured ball was made by me and is a styrofoam ball completely covered in small bits of ivory cashmere, painstakingly attached one by one with pins. It is soft and so fabulous. I included a small version of this for my ornament party last week. All my friends loved making the ornaments. It's so soothing to just sit and work on something like that. Over 100 pins and bits of cloth attached one by one by one. Why is that so relaxing? The repetitiveness? Maybe it's just working with cashmere.
On the next post I'll cover some of the other decorations around the house. Spoiler alert: I'm a sucker for ivory and metallic mantles.
Sunday, November 30, 2014
Sewing group project -- Holiday!
These rectangles have been waiting for completion since mid-2013. It's another project from my fabulous and crazy sewing group. Many of us have chosen the holidays as the theme of one of our projects. I decided to do trees. It could have been a single branch or even just the top, but everyone chose to do a complete tree. The background is hand-dyed (by me) wool. The thin black is velvet ribbon and the wider black is black wool.
The entire piece hangs above the French doors in my house. I normally hang my sheep there but now I will switch out the sheep in December in favor of my fabulous Christmas tree hanging.
Labels:
embellishment,
embroidery,
holiday decorating,
proddy,
rug hooking,
sewing group
Wednesday, November 19, 2014
Ugly Christmas Sweater Ornaments.
The holly leaves are my favorite, I think. Tiny pieces of green wool felt plus some red beads. So quick but really adorable. The leaves could even be a little bigger. The star is outlined with pearl beads using blanket stitch to line them up right along the edge.
These would also be cute in red wool or green wool. I can't wait to see what my party invitees come up with. These four sweaters are going into the sale I have tomorrow night at my boys' school. To appeal to the moms, I also made a couple of sweaters in maroon wool appliquéd with the logo of the school. These will sell very quickly, I think.
The nails are bent slightly to the center so I could get the shape off. You could also use finish nails which don't have a head on them. My dad would be proud that I know what a finish nail is. After getting the shape off the nails, I used a pliers to wrap one wire around the other and cut off the excess. Then, I took the other end and made a hook at the top, also cutting off the excess. These went so quickly! I think I made 20 little hangers in about 10 minutes. Now I have a whole pile ready for my party.
Monday, November 17, 2014
Ornaments -- I can't stop myself!
I'm having an Ornament-making Party in a few weeks. I don't know why I've never thought of this before given that I make ornaments every year for teacher gifts, present toppers, and for my own enjoyment. I'll post about all the party projects eventually but here are a few ornaments that I've made in anticipation of the Ladies Night Out shopping event that I'm participating in later this week.
These are tiny trees made from scraps of cashmere. The base is a vintage thimble. To make them, I first secured a wire in the bottom of the thimble. Then, I filled in the thimble with some beads to act as a kind of tree skirt. Once all that was dry, making these was a snap. I cut some of my varied green cashmere scraps into 6 different sizes of squares. I used a muffin tin to keep them all separated and then sat there stacking up the squares and threading them onto the wire. A loop at the top and a little circle of gold wool to act as a star -- super cute and super easy once the gluing is done. I also made some of these in shades of ivory but I'm using a white tree so the green looks better. I'm actually using these as the party favor for my ornament party but I had a few extra so I'm putting them in my sale. I know they're going to sell. So cute. Vintage thimbles can be found for about $1 each on Ebay. I love the little brass-colored ones.
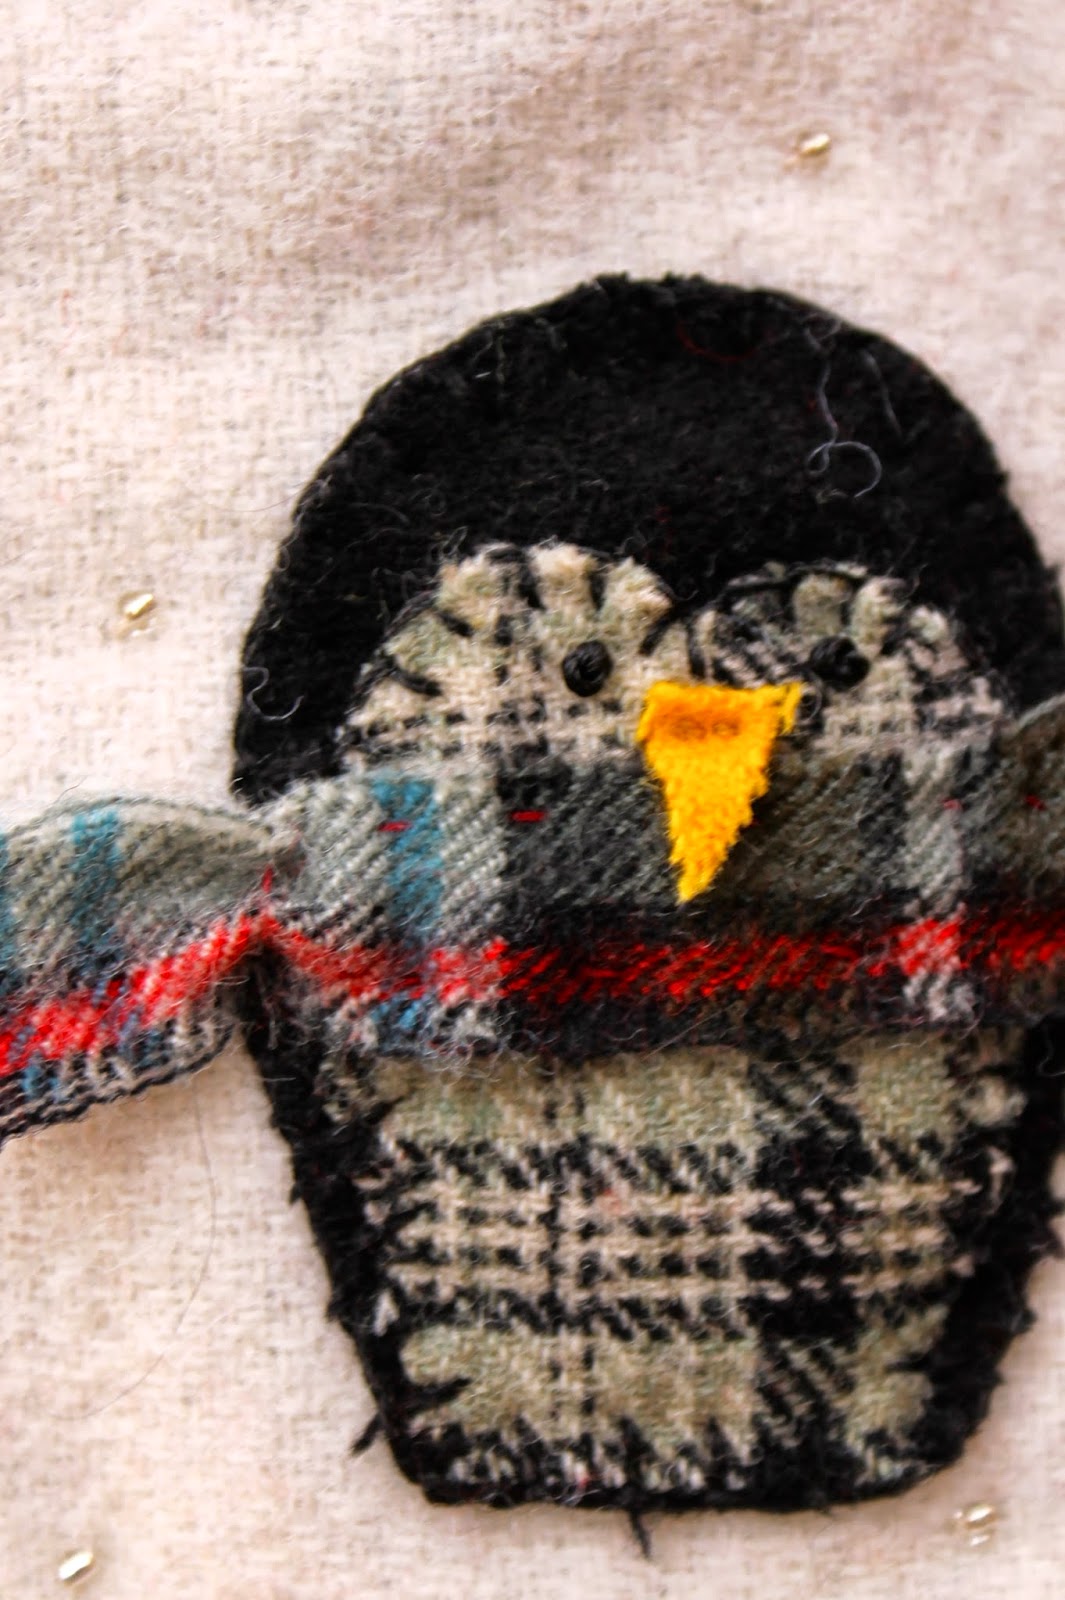
Next up is owls. I have a giant stash of plaid wool from thrifted skirts. As you remember from my penguin stocking, I like to mix and match and these little owls are so cute! I modified a design I had seen on Pinterest and made myself a pattern. It's all hand-sewn and stuffed with a little bit of my cashmere and wool scraps. I can't bear to throw even a little bit of cashmere away... I really love the black and white owl with the contrast red stitching. The earth-toned owls look just like some of the color variations you find in nature, don't they? These owls are one of the projects for the ornament party.
Some of the women coming to my party don't sew. Not even a button. So, this will be a little bit of a stretch for them. It's all done in one long thread. First you sew on the belly, then continue up and around the outside. When you reach the point, you add some extra stitches to act as a beak before continuing down the other side. Just before finishing, you stuff a bit inside. You don't use much stuffing because the final step is to fold down the point and secure it with 2 buttons. I think the stitching on the buttons really makes it look like eyes. I used twine as a hanging cord on these so they had a more rustic feel. Super cute.
Finally, today, I'll showcase the cupcakes. I had hoped to use this as a project for the party but there's just too many steps and too much glue. Using Pinterest as a resource, I saw lots of options for these. I ended up using a cut-up toilet paper tube as my interior structure. I would have never thought of that. Naturally, the ribbing from some cashmere sweaters makes the perfect "wrapper." I glued a cashmere circle on the bottom of the tube and then hand stitched the ribbing onto the tube and around the circle. After the glue dried, I cut out 5" circles of cashmere, ran a running stitch around the outside, and pulled to make a kind of yo-yo. I stuffed that and the tube with cashmere/wool scraps and then glued the muffin top to the bottom. Again, I let the glue dry.
After drying, I threaded a long doll-making needle with my cord and ran the cord all the way up from the bottom, through the top, and back down. Knot and loop at the top and a knot at the bottom. This also served to secure the entire structure top to bottom. On some, I ran some trim around the join between top and bottom because I didn't love the way it looked. After all of this, I got out my beads and sequins and embellished the top of the muffin. Way more involved than I had hoped this project would be. I scrapped the idea of using it for the party because we just can't be bothered with waiting for glue.
Next post I'll tell you all about my little Christmas sweaters. I came up with a great way of making little tiny hangers for them!
Friday, November 7, 2014
It's all about the Penguins this year!
It all started with the little guy on the left. I bought him last Christmas in a great artsy shop here in my town. There's definitely some wool content in the black part and it's almost 1/2 an inch thick. I just love how the nose sticks out over the scarf. The eyes are embroidered but everything else is glued.
I decided the penguin was a little fubsy, though. In this new version, I slimmed him down and removed the little hand bits (for easier sewing and cutting). Now I had a pattern I liked and I went to town. I've made about 15 of these to use for holiday gifts. I don't plan to sell them so I had no moral dilemma about copying the original design. Plus, mine have some distinct differences. 100% wool. I bought some 5mm wool felt (which is fantastic stuff, BTW) to use as a stiffener in the middle. The black parts on the outside come from a black wool thrifted skirt. The black and white woven patterns are all upcycled as are the scarves. As is the nose!! So, no new material at all except the cord hanger and the embroidery floss used to French knot the eyes.
The penguins are about 2 1/2 inches tall. The scarves are teeny little strips of wool -- super cute! I did some beading on the outside so the ivory wool looked like slopes. They almost look like they're at a sledding party, don't you think? At the top, I took some raw edge wool and fringed it to add some detail that would pick up the patterns in the penguins. The blue background is hand-dyed by me. It sparkles in the light thanks to the tiny beads. I'm so happy with the final result and can't wait for the Stocking Party on December 3rd. The workmanship of all the participants is inspiring. All stockings are donated and then raffled off after they are displayed for a week or so. I've won a few stockings over the years and I cherish them. The proceeds this year are going to the Kent State School of Fashion to help fund a scholarship. Very fitting since The Grey Colt is my favorite clothing store ever. Happy Holidays!!
Labels:
felted wool,
ornament ideas,
recycled wool,
upcycled wool,
wool plaid
Wednesday, October 22, 2014
An amazing scarf series.
Last year I made a few of these scarves. A friend suggested I pursue a silk scarf backed in cashmere. Being who I am, I had to find some kind of source for second-hand silk. Enter Ebay and the fabulous search term, "recycled sari." All of the silk in these scarves came from used saris. Saris use about 5 yards of fabric because the fabric is wound around and around the body and then up and over one shoulder. That's why you also see fantastic border prints or embroidery on most silk used for saris. How do I know this? I'm not Indian but once I was in an opera about Gandhi. It was with Seattle Opera and I was in the chorus. All the women got to wear these amazing saris as part of our costume. Strange experience -- music by Philip Glass. Need I say more?
I washed the silk on gentle in the washer and hung it to dry. Silk tears along the grain just like wool so cutting the panels into scarf-sized pieces was super easy. The cashmere was cut 10 inches wide in as big of pieces as I could eke out of my bin of sweaters. The finished scarf is about 9 1/2 by 65 inches.
The scarves are listed in my Etsy shop for $75 plus shipping. Last year I sold out of all the silk/cashmere scarves I made. I have a feeling these ones are going to fly.
Labels:
Raging Wool,
recycled cashmere,
scarves,
upcycled silk
Subscribe to:
Posts (Atom)